Basics
Everything in your WordPress website is managed through the administrator panel (also referred to as the backend) of your site. For any updates or maintenance, the first step is to log into the backend.
Logging In
- In your browser, navigate to http://www.yoursite.com/wp-admin
- Enter your username and password and click Login
Changing Your Password
If you would like to change your password, in the backend, hover over Users and click Your Profile. From here you can change your password and other information associated with your user account.
Adding a New User
If you would like to add a new user, hover over Users and click Add New. In the next screen fill out any relevant information for your new user. The important thing you want to set up here is the “Role” field. An Administrator has access to everything in the backend, but a normal Subscriber can’t access the site’s backend or edit content. You will want any new user who will have access to the backend to be an Administrator.
Always use a strong password (upper and lowercase with numbers and punctuation) and never create a user with the username “admin” – the website is protected from hackers, but they will try this username first and so it should never be used.
Dealer Information
Your contact information, service area and social network information should already be entered in your dealer website. If you need to edit or add new information, in the backend, hover over Appearance and click on Customize. After making changes on the Customize page, click the Save & Publish button at the top to save your changes.
Contact Information
On the Customize page, click the Contact Information tab and add or update any of the fields there. This information will appear on your Contact page and the Email and Phone fields also appear in the header on all pages.
By default, the Contact page will display a Google Map using the address provided. This map can be hidden by checking the box labeled ‘Show Map on Contact Page?’.
Service Area
On the Customize page, click the Service Area tab. Here you can add text that describes your service area, for example, “All of greater Metro Atlanta and Georgia and surrounding areas, including Atlanta, Alpharetta, Lawrenceville, Woodstock, Kennesaw, Peachtree City, Carrollton, Lake Lanier, Athens, Macon, Columbus”
This information will appear in the footer of all pages.
Google Analytics
On the Customize page, click the Google Analytics tab. If you have a Google Analytics account for tracking visitors to your website (you can sign up for one here: http://www.google.com/analytics/) you should enter the account code here, i.e. UA-37918333-1.
Custom Logo
If you have a custom logo image for your website, you can upload it on the Customize page by clicking the Header Image tab.
Your logo will appear in the About section on the homepage if you have one set up.
SEO Hint: When uploading new images, including your logo, make sure to add a description of the image in the Title field and copy that description into the Alt Text field. Search engines use this information since they cannot “read” images.
Content Additions & Updates
This section describes how to make additions and updates to the posts, pages, photo galleries, and testimonials. Much of this information is applicable to any WordPress website and more detailed information regarding standard WordPress functionality can be read here: http://codex.wordpress.org/WordPress_Lessons
Home Page Settings
The Home page has unique options for editing the slideshow and other content areas.
From the backend, hover over Pages and click All Pages. Then find the page titled Home from the list and click on that title.
Slideshow Images
On the page editor screen you will see a box at the top called “Slideshow Featured Applications”
Choose at least one application type that your would like to highlight on your website (four have been chosen by default). Each slide will link to the appropriate application on your website. After your selections, click the blue Update button to save your changes.
Custom Slideshow Images
By default, the Slideshow Featured Applications section above will automatically select images, titles, and links set by STI. If you would like to use your own images, titles, and links you can add them to the Alternate Slideshow Images section.
Once images have been added here, they will be used in place of the Featured Applications setting above.
The order of the images can be updated by clicking the row number area and dragging and dropping the rows into the desired order.
For best results, images should be at least 1200 pixels wide. The top and bottom will be cropped to fit the slideshow area.
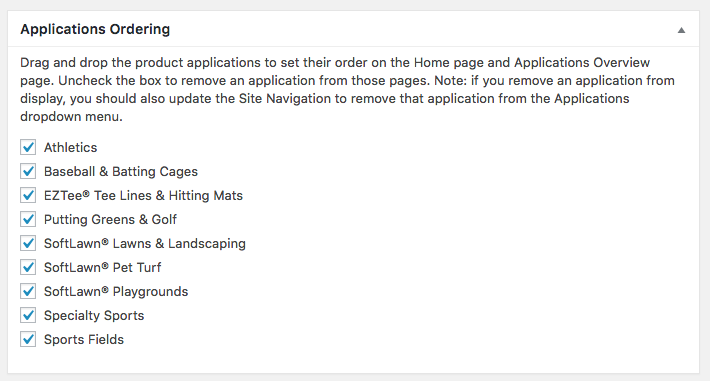
Applications Ordering
The order of Applications listed on the Home page and Applications Overview page can be customized on the home page. In the “Applications Ordering” box, drag and drop the list of Applications to adjust their order.
Home Page Content Areas
There are four editable content areas beneath the slideshow settings on the home page: a one-column section, a two-column section, a parallax section, and a testimonials sections.
One Column About Section
This section contains an editable title and text area as well as a background color selector. This area is generally used to include information about an individual dealer.
Two Column Section
The left and right columns contain text boxes that can be edited just like the normal text editor. These areas can contain a combination of text, images, and links. Animations can also be added to each column by selecting the Animation Type underneath each column.
Parallax Section
The parallax section contains a background image, title, text area and a button/link. The background image should be large since it will be the full width of the browser window. 1200 pixels wide or larger is recommended. This area also allows you to set an Animation Type that will affect how the text and button appear over the background image.
Testimonials Section
The testimonials section appears at the bottom of the Home page and contains an editable title and text area. If you have created any Testimonials, up to three testimonials will appear in a slider underneath the testimonials text section.
Adding Photo Galleries
Each dealer website includes nine Photo Galleries that represent each of the STI applications. These can be edited to add or remove images, or removed altogether if you wish. Ten photos from each Gallery appear on the Photo Galleries page, and the title of each Photo Gallery is used to filter through the galleries at the top of that page.
New Photo Galleries can be created by hovering over Photo Galleries in the backend and clicking Add Photo Gallery. After adding the title for the new Photo Gallery, click the Add Media button above the toolbar. Then click the Create Gallery link at the top left. Upload new images from your computer or select existing images from your Media Gallery.
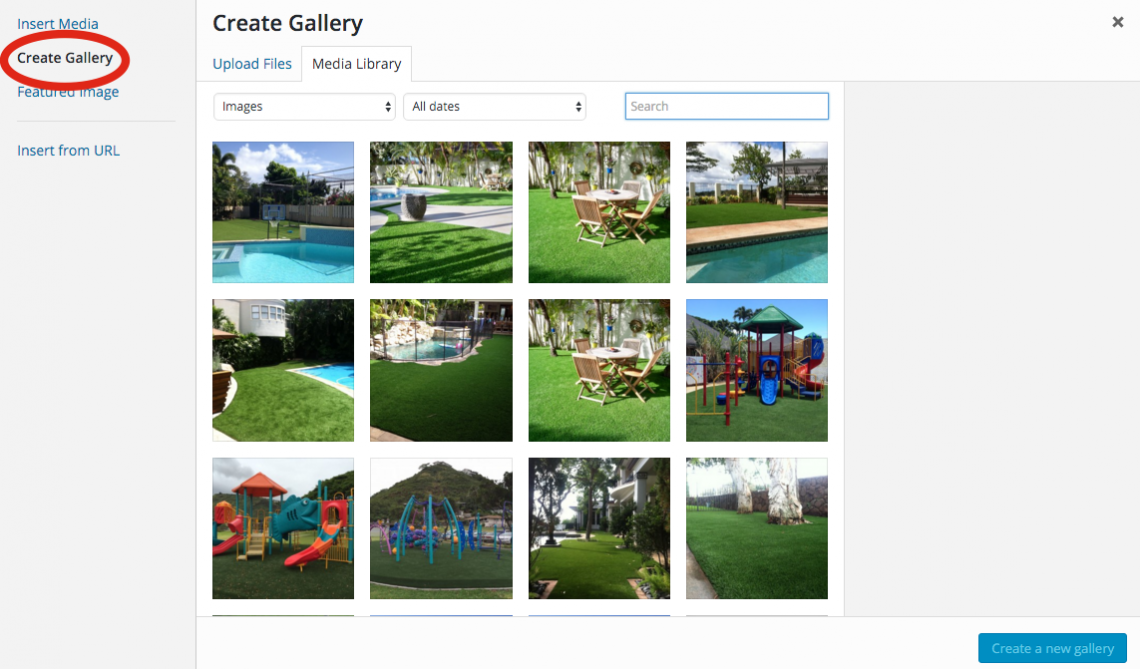
After the images are selected, click the blue Create New Gallery button at the bottom. On the Edit Gallery page, you can re-order the images, delete individual images, or add more images to the new gallery.
Tagging images – tags can be added to individual images by using the Image Tags field on the lower right. Existing tags can be added to each image, or new tags can be created by clicking the “plus” icon in the Image tags field. When Photo Galleries are being viewed by your site visitors, the images can be filtered by tags.
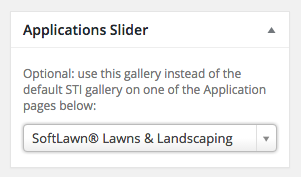 Assign Gallery to Application – By default, the image slideshow that appears on each Application page comes from the main STI site. If you wish to use images from your own galleries on those Application pages instead, select the Application from the Applications Slider box in the right sidebar.
Once the image gallery has been inserted into your new Photo Gallery, click the blue Publish button to publish the gallery.
Editing Photo Galleries
In the backend, hover over the Photo Galleries tab and click Photo Galleries. Then find the photo gallery you want to edit (e.g. Putting Greens & Golf ) and click the title to open the editor screen.
You will see a list of thumbnail images that comprise the photos in that gallery. By clicking anywhere on those images you will be shown two icons, the pencil icon and the delete icon. Click the pencil icon to edit the photo gallery.
In the Edit Gallery page, click and drag the images to reorder them. Hover over an image and click the “X” to delete that image for the gallery (it will remain in your Media Library in case you want to use it elsewhere).
To add new images to the gallery, click the Add to Gallery link at the upper left. This will open a page where you can upload images from your computer or select images from the Media Library. You can select multiple images to add to the gallery by simply clicking each image you wish to add. After your selections are complete, click the blue Add to Gallery button at the bottom.
After your Photo Gallery has been updated, make sure to click the blue Update button to save the changes.
Testimonials
Testimonials can be added and edited by hovering over the Testimonials tab in the backend and clicking Testimonial to edit existing testimonials, or Add Testimonial to create a new one.
The name, position, and location of the person giving the testimonial is entered into the Title field. The testimonial quote is entered into the text editor box below. No text styling is required.
If this is a new Testimonial, click the blue Publish button when finished. If this is an existing Testimonial that you are editing, click the blue Update button to save the changes.
Creating Posts
The News pages of your dealer website list the posts you create. New posts are a great way to inform your visitors about news in your industry, information related to your service area, recently completed projects, etc. Posts can be categorized and tagged to allow for easy navigation and site content organization. New content is also great for your site’s search engine ranking.
To create a new post, in the backend, hover over the Posts tab and click Add New. Enter a title into the Title field. This will appear at the top of the new post on the front end. Text and images can be added in the text editor box below the Title field. The post editor works like a word processor. You can add, remove, and update text and images using the buttons in the toolbar. For more editing options, click the toolbar toggle icon at the upper right of the toolbar:

Adding Text
Like a word processor, text can be styled by selecting the text with your mouse, then clicking on one of the toolbar icons such as the font color, bold, or italics icons. Text can also be styled by selecting some text and then choosing a Heading option from the text styling dropdown selector:

The predefined heading options will appear on your page like this:
Heading 1
Heading 2
Heading 3
Heading 4
Heading 5
Heading 6
SEO Hint: Appropriately used headings improve your SEO by informing search engines of important text – but there should only be one Heading 1 tag per page and that is already being used by the text in your page title. So if you use headings, avoid using Heading 1.
Adding Images
New images can be added by uploading them from your computer or by selecting previously uploaded images from your website’s Media Library. Here are the steps:
- In the text editor box, place your cursor where you want the new image to appear
- Click the Add Media button just above the toolbar

The Insert Media screen will appear where you can choose to Upload Files or select one from the Media Library. Once an image is selected, you will be able to set the image alignment, add a caption or a link.
SEO Hint: When uploading new images, make sure to add a description of the image in the Title field and copy that description into the Alt Text field. Search engines use this information since they cannot “read” images.
Updating Images
Clicking on an existing image in your post will allow you to:
- Remove the image (by clicking the X, the image will remain in your Media Library in case you want to use it again)
- Edit the image (by clicking the pencil icon)
- Resize the image (by clicking and dragging on the resizing handles)
Clicking on the pencil icon will allow you to change the the alignment of the image (left, right, center, none), add a caption or a link.
After preparing your new image, click the blue Insert Into Page button at the bottom of the page.
Image Galleries can also be added to a post. See Photo Galleries for instructions on adding galleries.
Categories & Tags
Categories and Tags are used to organize your posts making it easier for visitors to find the information that interests them. The categories you create will also appear as links on the sidebar of your posts pages. Clicking these links will show only posts form the category clicked. Tags work in a similar way, but tag links only appear at the bottom of a post – not in the sidebar.
Categories can be though of as a table of contents for your posts. The titles should be short, direct, and informative – such as Backyard Turf Installations, or Recent Projects. By default, your site will have one category titled “Your Site News”. New categories can be created when adding or editing posts by clicking the + Add New Category link in the Categories box. Posts can be assigned to multiple categories. Simply check the box next to one or more categories.
Where Categories are a sort of table of contents for your posts, Tags should be thought of as an index for your posts. Tags are generally shorter in length than categories – one to three works long – and act like micro-categories. Tags are added to the Tags box by entering them separated by commas. If you have already added some tags, you can click the “Choose form the most commonly used tags” link to select from your previously entered tags.
Featured Images
If you add a Featured Image to your post, it will be displayed as a large banner at the top of the post. Images here should be 1200 pixels wide and 600 pixels high or larger.
Publishing your Changes
To the right of the post Title field is the Publish box. After editing your post, make sure to click the blue Update button to save them.
The Publish box has many other features:
- Before saving your changes, your can preview them by clicking the Preview button. This will open a new window where you can view your changes.
- You can change the Status of the post by changing it from Published to Draft or Pending Review. Only posts that are Published will be visible on the front end of your website.
- You can look through your post page revisions and restore an earlier version.
- You can change the Published date – useful for scheduling the post to appear at some time in the future.
Contact Forms
The Contact Form on your website has been set up and tested to work properly without modification. Editing the forms or settings is not recommended. However, you may find the need to view previously submitted contact forms. This can be done by hovering over Forms in the backend and clicking on Entries. A list of previously submitted entries will be shown. Clicking the first name of any entry will open that entry up for viewing.
You may also wish to download a list of entries. This can be done by hovering over Forms and clicking Import/Export. On the next page, choose the General Information Request form from the dropdown list. You will them be given options for which fields to export and an option to select a date range. Clicking the Download Export File with provide you with a CSV file of the entries you selected.
UPDATE 05/15/2018: STI has switched from using Gravity Forms to control the website contact forms to Formidable Forms. This was done to enhance functionality and security of the contact forms. The instructions above still apply to older contact form submissions made using Gravity Forms. For more recent contact form submissions, hover over the Formidable menu item and click Entries.
Search Engine Optimization
Search Engine Optimization (SEO) is a term used to describe the techniques and processes involved in improving the visibility and rankings of a website on search engine results pages. Below we will introduce some of the basic concepts and then provide details for how to apply these concepts to your STI Dealer Website.
Introduction to SEO
SEO covers a broad range of activities that can improve your rankings on search engines. These activities include:
- linking back to your site from from other resources on the internet including other reputable websites and your social networks (e.g. LinkedIn, Facebook, Twitter, etc.)
- pay-per-click services such as Google AdWords
- hiring third-party SEO services to increase your site rankings
The focus here, though, is to explain the techniques for the best on-site SEO and point out tools that are available on your website to help with that.
Content is King
There are many different opinions about the best way to optimize a website for search engines, but the one thing that everyone agrees on is that Content is King. All the SEO tricks in the world will not do much good if your site is lacking the content that your visitors are looking for.
The content of your website should be well structured, easy to read and understand, relevant to your visitor’s searches, and updated frequently.
Relevancy & Keywords
As mentioned above, the content of your pages and posts needs to be relevant to the content being searched for by your visitors. The entire point of search engines is to match the users search terms with what the search engine judges to be the most relevant match. So if you are creating a post that you want to rank high for a search term such as “artificial pet turf in Nome, Alaska”, you will want to write content focused on that topic and use keywords throughout your content that might be found in your visitor’s searches such as: Nome, Alaska, pet turf, artificial turf, synthetic turf, Alaska pet turf, etc.
SEO for Page and Post Content
General Content Tips
For best SEO, it is recommended that your pages and posts contain at least 300 words. This enables search engines to get a good idea of the general topic and can direct visitors to that page even if they do not search for exact words or phrases found in that page.
The 300 word minimum is a recommendation and not a rule. Filling your page or pst with irrelevant content just to reach 300 words will not help your SEO and, in some cases, may hurt. It is critically important that your content is relevant to what your visitors are searching for.
Content Structure
Pages and posts should be well structured, using headings, paragraphs and lists where appropriate. This structure makes the page easy for the visitor to read and also makes it easy for search engines to know the main topics being discussed.
Headings provide a visual outline for the content of the page and catch the reader’s eye, allowing them to quickly see what topics and sub-topics are being discussed. Headings are a great place to add keywords that your visitors may use to search for your content.
On websites, headings are numbered from 1 to 6 where Heading 1 is the top-level heading. Because Heading 1 is the top-level heading, it is reserved for the page title and any page or post you create will automatically assign Heading 1 to the title. So the content of your page or post should avoid using Heading 1. Headings in your content should start with Heading 2 to mark the page’s main topics, then Heading 3 for sub-topics, etc.
More about adding content and formatting headings can be seen in the Creating Posts section here.
Categories and Tags for SEO
WordPress websites are basically comprised of two types of content – pages and posts. Pages are generally more static, they don’t change often and are not categorized. Think of your home page or contact page.
Posts on the other hand (often referred to as blog posts) are generated and updated more frequently and can be categorized and tagged which allows them to appear through a variety of navigational methods on your site. For example, a post categorized under Recent Projects and Pet Turf Projects will appear on post archive pages that list all posts under those categories.
Posts can also be tagged. Tags can be thought of as micro-categories, or, another way of looking at it, if categories are the table of contents for your posts, tags represent the index. So for instance, if you have a category of posts called Pet Turf Projects, you may have some posts under that category tagged as “commercial”, side yard”, “dog”, or “horse”.
Do not duplicate! Do not to create tags that are already categories.
When you create categories and tags and assign posts to them, your website will automatically generate an Archive page of those posts. Archives pages list all posts under those categories or tags with excepts and links to the full post. The Archive page title will be the name of the category or tag. These pages, like any other on your site, are indexed by search engines and will appear in search results pages.
Because of this, you may want to title all categories and tags to represent a keyword that a visitor would potentially search for. To continue our example from above, if a visitor searched for “commercial pet turf projects”, the search results page may list your Pet Turf Projects category archive page and/or your Commercial tag archive page.
More information about setting up categories and tags can be seen in the Creating Posts section here.
SEO for Images
Image that are added to your pages, posts, and galleries offer another avenue for optimizing your pages for search engines. Search engines cannot read the actual image, but they can read the image filename, title, and alt text.
Alt text is used by web browsers as an “alternate” to the image. In the case that the link to the image is broken, or if the visitor is visually impaired, the browser will display or speak the text entered into the image’s alt field.
So to optimize images, consider doing the following:
- Rename the image file before uploading to something relevant like “synthetic-turf-pet-lawn.jpg”.
- After uploading the image, create an SEO friendly title that is both relevant to the image and to the page or post it is being used on.
- Copy the text you entered into the title field and paste it into the alt text field.
SEO Toolbox
All STI Dealer Websites come with an SEO Toolbox that appears at the bottom on each page or post editor screen. This tool box can be used to adjust the page title for better SEO, add a custom meta description that will appear on search results pages, test the page for specific keywords, and provide general feedback and tips related to the content. This SEO toolbox is powered by the Yoast SEO plugin and more documentation on all the features included can be read here: https://yoast.com/wordpress/plugins/seo/#features
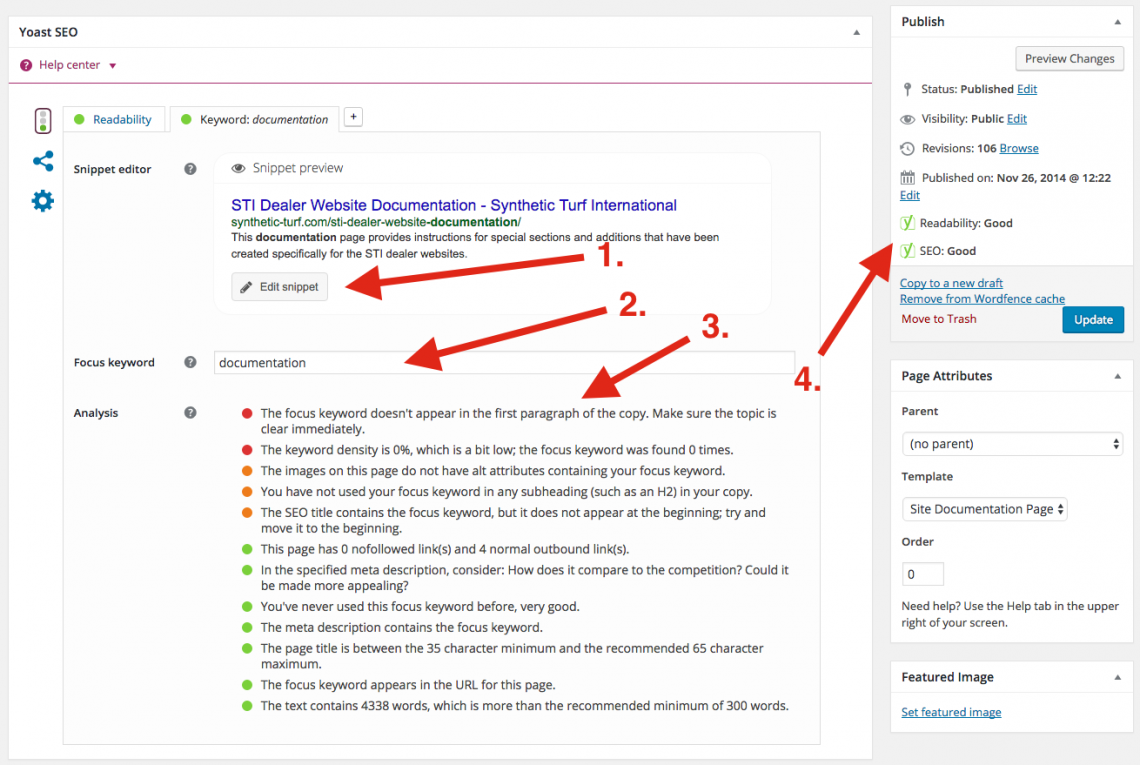
By clicking the Edit Snippet button (see #1 above) you can adjust how the page title, URL slug, and meta description appear on a search engine results page. Typically you will not need to change your SEO title or URL slug, but the meta description is commonly changed for better SEO. By default, a search engine will use the first 160 characters of your page content as the description shown on the results page. Often times those first 160 characters are not completely optimized to include all the keywords related to your page content. Use the meta description editor box to create a custom description.
You can analyze the content of you page or post by adding a keyword to the Focus Keyword box (see #2 above). By entering a word or phrase here, the SEO toolbox will check your content for that keyword and provide feedback for how well (or poorly) it appears in your content. A color-coded summary of the analysis is also shown in the Public box on the upper right of the editor page (see #4 above) and when viewing the lists of all posts or pages in the backend.
A more detailed Analysis section is show below the Focus Keyword box (see #3 above). This section provides many hints and tips to allow you to edit the content and Snippet to maximize the page SEO. Keep in mind that these are suggestions and recommendations and you will not always be able to achieve green lights in every category.

Social Networks
On the Customize page, click the Social Networks tab. Scrolling down you will see fields labeled by their social network, such as Facebook, Twitter, etc. Add the URLs (i.e. https://www.facebook.com/STI ) for your existing social networks into the corresponding social network fields.
Remember to click the blue Save & Publish button at the top of the page after making changes.